If you’ve been noodling around with the idea of swapping your heavy, sagging lead-acid battery for a modern lithium iron phosphate (LiFePO4) battery in your RV or travel trailer, you’re in the right place. I’m Jon — The Net Guy — and I walk through the practical facts, trade-offs, and real-world gotchas that most folks don’t realize until they’re knee-deep in cables and fuses. This article covers capacity, charging behavior, safety, temperature issues, inverter sizing, DC-to-DC charging, drop-in upgrades versus buying a power station, and a practical checklist so you can decide whether and how to take the plunge.
Considering this item? Using my Amazon affiliate link here earns me a small commission. Thanks! 
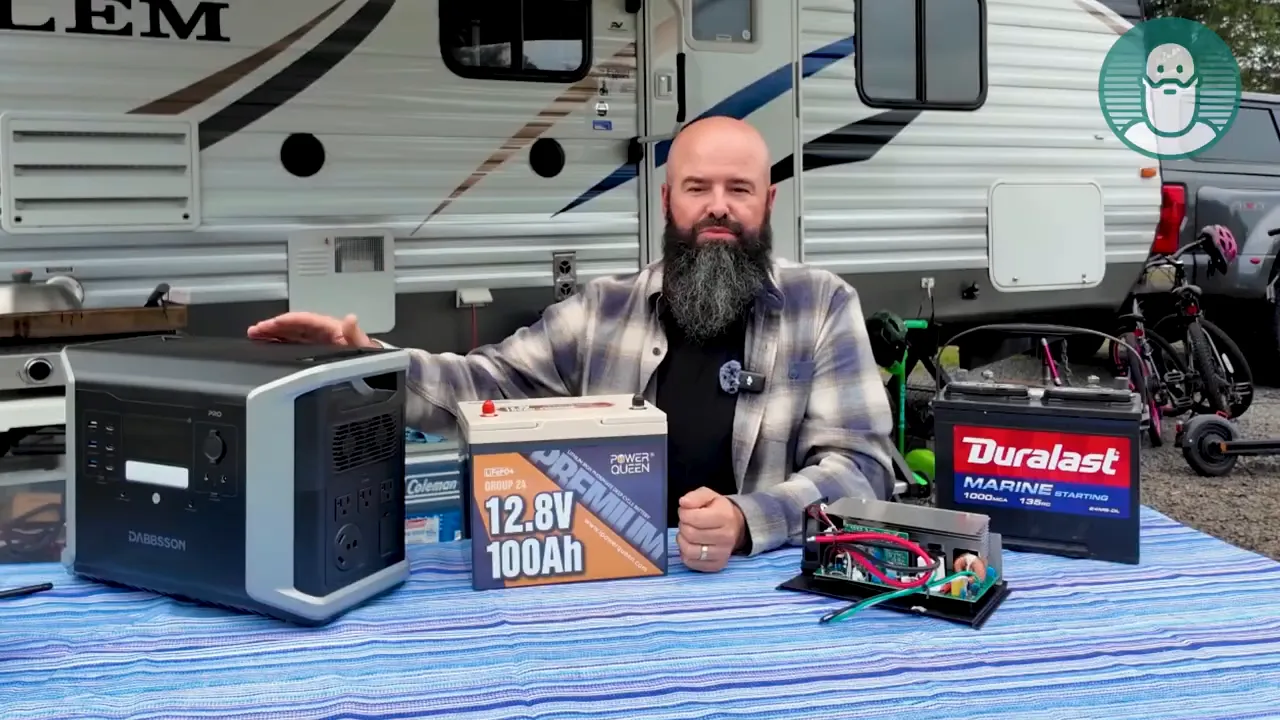
Why LiFePO4 Makes Sense for a Travel Trailer
Travel trailers are, by design, 12V systems. We run lights, water pumps, fridges, routers, Starlink terminals, and phone chargers off that relatively simple architecture. Lithium iron phosphate batteries are a near-perfect fit in many cases because they deliver more usable capacity per pound, have a long cycle life, and generally lower long-term total cost of ownership than lead-acid equivalents.
Here’s the core of the argument: a modern 100Ah LiFePO4 battery typically weighs roughly 20 lbs. A traditional deep-cycle lead-acid in a similar physical size (group 24/27) can weigh 40–65 lbs and offer far less usable capacity in real conditions. For full-depth usable cycles, lead acid is typically limited to around 50% discharge (and even that shortens its life significantly). By contrast, LiFePO4 gives you 80%–100% usable capacity depending on how you run it — and does so for thousands of cycles with very little memory effect.
Real capacity and weight comparison
- 100Ah LiFePO4 (≈20 lb): 80–100 usable Ah depending on your preferences (80% usable is a common design choice to maximize life).
- Group 24/27 lead-acid (40–65 lb): often only ~55-85Ah usable in practical reserve capacity conditions and will degrade much faster with deep cycles.
That’s a meaningful capacity-per-pound gain — and for towing and tongue weight concerns, lighter batteries change the game.
Charging: Converters, Charge Voltages, and “Lithium-Ready” Systems
This is where many upgrades go sideways. If you drop a LiFePO4 battery into an older travel trailer that still has a converter/charger designed for flooded or AGM lead-acid batteries, two immediate problems show up:
- Voltage mismatch — traditional converters usually float/absorb charge at voltages appropriate for lead-acid chemistry (often below the optimal lithium charge voltage). Lithium wants higher absorption voltage — typically in the 14.2–14.6V range depending on manufacturer. If the converter cannot reach this, your lithium battery will only charge to roughly 80% SOC (state of charge) and you’ll be leaving capacity on the table.
- State of charge sensing — LiFePO4 maintains a higher and flatter voltage curve across most of its discharge window. In other words, for many volts readings that indicate “half” for lead acid, lithium will appear nearly full. That can fool simple voltmeters and RV panels that estimate state of charge by voltage alone.
Bottom line: you either need an auto-detecting converter/charger that recognizes lithium chemistry and adjusts charge profiles, or you need to replace your converter with a lithium-capable charger. Many RVs built around 2020 and later may already include an auto-detecting unit, but older rigs will not.
What to look for in a charger
- Explicit LiFePO4 or lithium-compatible modes.
- Absorption voltage adjustable into the 14.2–14.6V range.
- Multi-stage charging with bulk, absorption, and float tailored for lithium cells (float voltage is typically lower or managed differently).
- Ability to interface with battery management systems (BMS) or support external battery meters for accurate state-of-charge readings.
Voltage Behavior and Why Simple Voltmeters Mislead You
One of the most overlooked aspects of LiFePO4 is how flat the voltage curve is. A fully charged LiFePO4 battery sits around 13.3–14.0V and it will hold relatively high voltage through roughly 70% of its usable capacity. In other words, for most of the discharge, your voltmeter will show little change.
Contrast that with lead-acid: voltage drops more linearly as capacity is removed. That voltage drop is how simple RV panels estimate how much battery you have left. When you swap to lithium without updating monitoring, you’ll see the panel say “still nearly full” when you really might be two-thirds depleted.
Solution: add a proper battery monitor (Shunt-based monitoring systems are common) or use chargers and converters that include SOC calculations and Bluetooth/monitoring features. These will read actual current in/out and report true state-of-charge rather than guessing by voltage.
Usable Capacity, Cycle Life, and Real-World Expectations
Manufacturers of LiFePO4 often rate batteries for thousands of cycles because the chemistry is extremely stable. Typical numbers:
- 80% Depth of Discharge (DoD) cycles: 4,000–10,000 cycles with minimal capacity fade.
- 100% DoD cycles: around 2,000 cycles with some capacity reduction over time (maybe ~20% decrease after heavy full-depth cycling).
Compare that to lead-acid where deep discharges will quickly reduce life and you’ll see substantial capacity decline after only a few hundred deep cycles.
High-Drain Devices and Inverter Sizing
Don’t expect a single LiFePO4 battery to be a magic wand that runs every AC device in your trailer. A 100Ah 12.8V battery stores about 1,280 watt-hours (100Ah × 12.8V). In the real world, allowing for inverter inefficiency and not drawing the battery absolutely to zero every time, that’s closer to 1,000 watt-hours usable per battery if you use a heavy inverter load.
That means:
- Running a 1,000W continuous inverter is reasonable for some light AC loads (lights, routers, small appliances), but might not be enough for microwaves, hair dryers, or electric water heaters.
- Microwaves and some appliances are “duty cycling” devices. A microwave rated 900W in practice might pull 1,200–1,500W intermittently. Inverters need headroom to handle surge currents.
- Pairing batteries increases available continuous and surge power. Two 100Ah LiFePO4 batteries in parallel double capacity and parallel current capability, which often lets you run 2,500–2,560W total continuous inverter loads depending on battery specs and wiring.
So plan your inverter size against realistic appliance demands and remember surge capacity matters. If you want to run a water heater or electric furnace, lithium alone without a very large inverter (and huge battery bank) isn’t practical.
Safety, BMS, Mounting, and Disposal
LiFePO4 batteries include an internal or integrated battery management system (BMS) that performs critical protective functions: over-voltage protection, under-voltage protection, over-current and short-circuit protection, and cell balancing. High-quality batteries also include low-temperature charging cutoffs and sometimes even self-heating features.
Important safety details:
- Mounting flexibility: LiFePO4 cells are often safe to mount in any orientation — horizontal, vertical, or even inverted — but always check the manufacturer’s instructions. Some models may have orientation restrictions.
- Off-gassing: Unlike flooded lead-acid batteries, lithium batteries do not off-gas hydrogen during normal charging, so they can be installed inside living spaces with fewer venting concerns. Lead-acid batteries can off-gas and require venting and exterior mounting considerations.
- Temperature sensitivity: LiFePO4 batteries work fine at low temperatures for discharge, but charging below freezing can permanently damage cells unless protected by a low-temperature cutoff or self-heating element. Check for BMS low-temperature protection or self-heating capabilities if your battery will be mounted outside or used in winter climates.
- Recycling and disposal: Lead-acid recycling streams are well-established. Lithium recycling is improving but currently more complex and less universally available. Plan for end-of-life disposal logistics in your area.
Low-temperature charging — the single biggest “gotcha”
If your battery is mounted outside the RV and temps can drop below freezing, you absolutely need a BMS with low-temperature charge protection or a battery with built-in self-heating. Charging a lithium battery below freezing can cause irreversible damage. Cheap brands often skip low-temperature protection to save cost — so pay attention.
Tow Vehicle Charging, DC-to-DC Chargers, and 1C Charging
LiFePO4’s low internal resistance allows very fast charging relative to lead-acid. The industry shorthand “1C” indicates charging at a current equal to the battery capacity (a 100Ah battery being charged at 100A). Many LiFePO4 batteries will accept 0.5C–1C charge rates safely, enabling much faster top-ups from alternators or powerful chargers.
However, this is a benefit that introduces practical wiring and alternator concerns:
- Stock tow vehicle charge plugs are often limited by wiring or circuit breakers to 30A. Pushing a battery bank that wants more than 30A may trip fuses or stress relay circuits.
- If your tow vehicle alternator is high-output (e.g., 300A), the charging cable and trailer inlet determine how much actually gets to the trailer battery. A small wire or 30A limit is the bottleneck.
- Solution: install a DC-to-DC charger between your tow vehicle and trailer battery. These units handle alternator voltage fluctuations, provide MPPT solar integration on some models, and manage lithium charge profiles properly while preventing alternator/relay cycling or fuse blowouts.
Why a DC-to-DC charger is often worth the cost
Even though it adds budget to your upgrade plan, a DC-to-DC charger:
- Allows higher and controlled charging currents from the alternator safely.
- Manages the charge profile for LiFePO4 chemistry instead of relying on basic tow vehicle wiring.
- Many models include MPPT solar input, battery monitoring, and Bluetooth for SOC readouts.
- Eliminates common problems such as relay chattering or fuse trips when a lithium battery draws high inrush currents on connection.
Alternatives to Rewiring: Portable Power Stations
Not ready to rewire your rig or swap converters? Portable power stations (also called lithium battery generators) can be a pragmatic alternative. These units combine LiFePO4 cells, a high-capacity inverter, and AC/DC outlets in a self-contained package — many include convenient charging options (solar, AC, generator, or vehicle DC) and smart apps to control charge rates.
Example benefits:
- A 1,400W portable station often matches or slightly exceeds the capacity of a single 100Ah LiFePO4, but with integrated 2,400W surge capability to handle microwaves or other duty-cycle loads.
- Many come with a TT-30 plug so you can plug directly into the trailer’s shore power inlet (or into a generator) and recharge quickly.
- Bluetooth apps allow control of charge rates so you don’t overload your generator during recharge cycles.
- Portable units eliminate the need to modify the trailer’s converter or install complex wiring, making them attractive for older rigs or owners who want a plug-and-play solution.
Downsides: portable stations are separate units to carry and secure, and ongoing operation still requires mindful energy budgeting. But for many owners, a portable station is an elegant way to get Li-like capacity without invasive upgrades.
Step-by-Step Upgrade Checklist
If you’ve decided to upgrade, here’s a practical checklist I recommend you follow to avoid the most common pitfalls:
- Audit your current system
- Check the existing converter/charger make and model and whether it has a lithium or auto-detect mode.
- Inspect wiring gauge to the trailer battery, fuses, and the tow vehicle charge plug rating (30A vs higher).
- List your main loads and their wattage (fridge, inverter, microwave, TV, Starlink, heater, etc.).
- Decide battery capacity and physical layout
- One 100Ah Li is a big improvement over a single lead-acid, but two 100Ah gives you more range and inverter headroom.
- Plan mounting location with manufacturer orientation rules and ventilation in mind.
- Choose a charger/converter and monitoring solution
- Upgrade to a lithium-capable charger if your existing one cannot reach 14.2–14.6V absorption and manage SOC properly.
- Install a shunt-based battery monitor for accurate SOC reporting or select charger units with integrated monitoring/Bluetooth.
- Plan DC-to-DC charging if you tow frequently
- Install a DC-to-DC charger sized to the battery bank and alternator to avoid reliance on thin tow cables.
- Consider devices that include MPPT solar input and Bluetooth monitoring to centralize charging sources.
- Size your inverter and wiring
- Pick an inverter that meets continuous loads and surge needs. Plan for microwaves and surge-heavy devices.
- Use proper gauge cabling and fuses sized to the inverter and battery bank.
- Consider low-temperature protection
- Choose batteries with BMS low-temperature shutdown or self-heating if batteries will be outside or in cold climates.
- Test thoroughly and adjust
- Run real-world scenarios (overnight with fridge + router + lights, microwave sessions, towing recharge) and watch SOC and voltages closely.
- Adjust charging rates and inverter usage as needed.
Common Questions & My Recommendations
Q: Can I just drop in a lithium battery and be done?
A: Not usually. You’ll likely need a lithium-capable charger or an upgraded converter to actually charge it to full. Without that, expect to leave ~20% capacity unused.
Q: Do I still need an inverter?
A: Yes, if you want to run AC devices (microwave, hair dryer, AC-powered water heater). Lithium batteries provide DC energy; an inverter is required for AC loads and should be sized for both continuous and surge demand.
Q: Can I charge lithium from my tow vehicle?
A: Yes, but use a DC-to-DC charger to manage charge profile and current safely. The tow vehicle plug wiring often limits current and can be damaged by high draw unless upgraded.
Q: What about winter use?
A: If you operate in freezing conditions, buy batteries with a built-in low-temperature charge cutoff or self-heating. Otherwise, mount them inside a heated compartment or consider lead-acid for winter-only rigs (with the trade-offs discussed earlier).
Cost Considerations: Upfront vs Long-term
LiFePO4 batteries have come down in price significantly, making them competitive with the total lifecycle cost of lead-acid. Upfront cost is still higher, but when you factor in longer service life, deeper usable capacity, reduced maintenance, and weight savings, many owners find lithium to be the better investment after 3–5 years.
Remember the hidden costs:
- Converter/charger replacement if needed (lithium-compatible).
- DC-to-DC charger for safe alternator charging.
- New inverter or upgraded wiring to handle higher continuous/surge currents.
- Potential mounting, ventilation, and monitoring upgrades.
Plan your budget around the whole system — not just the replacement battery. A 100Ah LiFePO4 alone is great, but if you have to replace an old converter and add DC-to-DC charging anyway, those add up. That said, those components improve overall reliability and make the rig far more capable.
Final Thoughts — Is Lithium Right for Your RV?
For most travel trailer owners in 2025, LiFePO4 is an excellent upgrade: lighter weight, far more usable capacity, longer lifespan, and better performance under load. But it’s not always as simple as swapping a battery. Pay attention to charge voltages, monitoring, tow vehicle charging limitations, and winter charging risks.
If you’re comfortable planning a small electrical upgrade (new converter or DC-to-DC charger, proper battery monitor, and correct inverter sizing) lithium will likely be one of the best investments you make in your rig. If you’re not ready for that complexity, portable power stations offer a plug-and-play taste of lithium benefits without rewiring.
I’m heading into the shop to do this upgrade on my trailer — new converter, DC-to-DC option, and a two-battery bank plan to give me both range and inverter headroom. If you want a step-by-step walkthrough of a travel trailer lithium conversion, stick around for the next post and the video walkthrough that will show every step in real time.
Considering this item? Using my Amazon affiliate link here earns me a small commission. Thanks!
If you like this kind of deep-dive into practical tech and RV upgrades, subscribe to my YouTube channel: https://youtube.com/thenetguy